
*The following post is sponsored by Head & Shoulders.
This post is going to show you how to install lemonade braids and how to prepare your hair before you braid it and how to care for your hair after the braids are in. To achieve this look I used five packs of Harlem 123 Jumbo Braid Silky Hair in color number two.
Let’s Prep:
I first washed and conditioned my hair with Head & Shoulders Dry Scalp Care shampoo and Hair & Scalp conditioner
both with almond oil. These two products will get my hair completely clean and prep it for braiding while keeping it from being dry after the braids are in. The best thing about this product is – it’s formulated for curly textured hair, it deeply cleanses the hairs and scalp, and it restores your scalps natural moisture barrier.
Let’s get started!
- After you wash and condition your hair you’re going blow it out.
- If you need help blowing out your natural hair I have a step by step tutorial that will help you.
- Part your hair into sections for ease and to help keep the design in order.
- Separate the braiding hair for those sections. Make sure the first few sections of hair are smaller then move to larger sections.
- Used a little edge control to get a better grip when you start braiding. It also gives it a professional look.
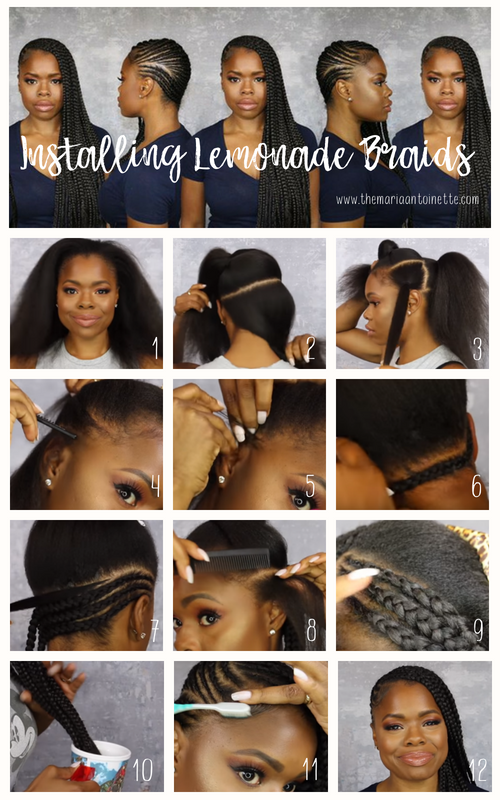
Section One – Side Swoop Part & Braid:
- Part a small section. Begin braiding a fine amount of your hair. Braid your hairs back a little bit before you add the feed in process.
- Take a small piece of braiding hair, wrap it around a fine piece of your hair and continue cornrowing as you normally would.
- To add in the braiding hair start with it behind your head, grip with your pinky, tuck the other side under your pointer finger and grip with your thumb.
- When I do my feed in cornrow I add my hair on the same hand position as I did the first piece of add-in hair.
Section Two: Box Braids
- If you don’t know how to box braid I have a great tutorial that will help you along.
- The smaller section on the left side where the hair will cover my ear I’ll be doing box braids. This is how you get the fullness going.
- Take a strip of sectioned braid hair and split it in 3/4ths and 1/4th, then loop them together making three evenly distributed sections of hair.
- On my head, I did three rows with three to four box braids per row.
- To get your braid to lay flush against your head you need to braid past your scalp and keep braiding the same way all the way down.
Section Three – Invisible Feed-In Cornrows
- If you don’t know how to do this type of cornrow here’s a tutorial to help you out.
- Always keep your hair tight and in place between your pointer finger and thumb.
- Check you feed-ins to make sure they all look the same and start at the same point so they look uniform.
When you’re done installing the braids take a cup of boiling water and dip the ends to seal them. And don’t forget those edges, you know what to do with them, lay’em!
Post Braiding
To care for your scalp while your braids are in you’re going to use Head & Shoulders Clinical Solutions. It’s a leave-in treatment that you are going to apply right to your scalp and massage it in. This is going to help prevent dry scalp and flaking while your braids are in.
Protective Styling Tips:
- If you want your hair to grow don’t wear protective styles too long. Your hairs need a rest from the tension of being pulled.
- Take care of your scalp. When your scalp is healthy your hair will be healthy. Learn about my scalp care hair growth routine here.
Share your lemonade braids with me on social using #TMABlog.
Latest posts by Maria Antoinette (see all)
- 10 Romantic Date Night Ideas For Any Time of The Year - January 26, 2023
- Tips To Help You Reconnect With What Brings You Joy - January 19, 2023
- Planning A Road Trip? Here Are Some Key Tips You Should Know - January 12, 2023


