
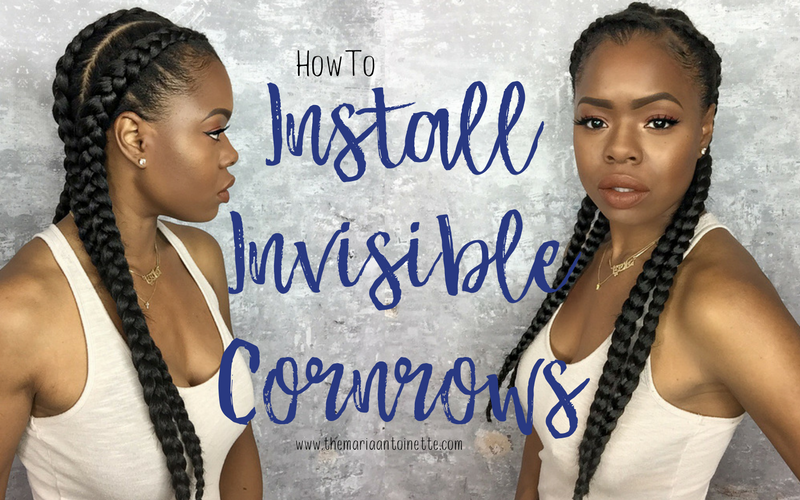
Cornrows are a staple protective style. It doesn’t matter what age you are, you will most likely rock cornrows at some point in your life. Today I will walking through how to install invisible cornrows extensions with the undetectable feed-in technique. This technique is often referred to as Ghana braids, banana braids and or cherokee braids. The feed-in braiding method, allows you to add extension into your braids without all the bulk. Invisible cornrows are definitely a go to style for beach trips, vacations, or everyday busy schedules. Whats not to love!? Besides making us all look like real goddesses, the low maintenance and the short amount of installation time can’t be beat. So, are you ready to learn how to install invisible cornrows on your own head?
What I used:
- 3 Bags of Kanekalon Tangle-Free Braiding Hair (any brand)
- Cantu Coconut Curling Cream
- Cantu Edge Stay Gel
- Black Elastic Bands
- Rat Tail Comb
- Edge Brush
- Sheers
Directions:
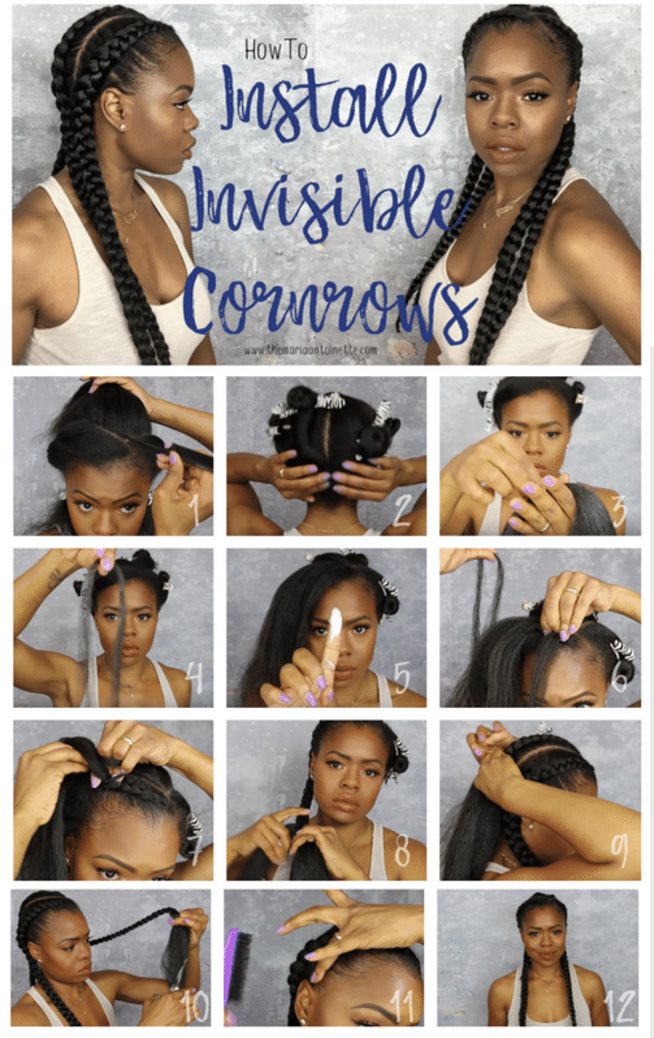
Prep Your Hair:
- Part your hair (IMPORTANT)
- Use rat tail comb for more defined parts
- Section off each parted area of hair
Prep Your Braiding Hair:
- Section out small pieces of the hair to be fed into your own hair
- Start out with small pieces and gradually work up to larger pieces
- Total pieces should be around 24 each for a thick cornrow, 12 pieces for a natural cornrow
- Lay each bundled section off to the side for easy reach while braiding
Installation:
- Apply cantu coconut curling cream to your own hair for hydration
- Start braiding your own hair back about two sections
- Add braiding hair as you go into the third section
- TIP: Start each add in with the same hand each time (I used my left hand)
- Bring hair around back of your head, position towards hair line holding the hair in a loop shape
- Grip one side with pinky, place other side of hair under left pointer finger
- Continue braiding, feeding in the braiding hair
- Repeat. Feed in your previously sectioned out braiding hair, small to large, as you braid down
- Be sure to position each add-in behind your head
- TIP: If you want a thicker braid, add in braiding hair through the entire braid
- Braid to the end. Secure the end of the braid using an elastic rubber band
- Tuck the end of the braid into the elastic rubber band
- Trim the excess hair and “fly aways” making sure not to cut your hair
- Apply edge control using pointer finger
Still need a little extra guidance? I’ve got you covered. Feel free to reference the full video here:
With a little bit of patience and time you will have a go to protective style on deck! Remember, If you are new to braiding check out my How to Cornrow your Own Hair post, practice makes perfect and braiding hair is inexpensive so no fear in making a mistake! Are you excited about trying this look? Chime in below. I would love to hear from you. You are also invited to sign up for my newsletter so you will always be in the know with all things MA. If newsletters aren’t your thing simply download my App
!
~MA
Latest posts by Maria Antoinette (see all)
- 10 Romantic Date Night Ideas For Any Time of The Year - January 26, 2023
- Tips To Help You Reconnect With What Brings You Joy - January 19, 2023
- Planning A Road Trip? Here Are Some Key Tips You Should Know - January 12, 2023


