
Before we get into this super awesome DIY wooden photo holder, let’s chat photo displays for a moment shall we? I know. Gallery walls are all the rage right now. And I’ll be honest, a gallery wall is super fun to tackle, especially because of its versatility in style. The possibilities are endless.
However, sometimes you just don’t have the time needed to curate a full wall and collection of captivating images. Well guess what? That’s okay. Sometimes all it takes is one or two images to rouse our best memories and tell the stories we never want to forget.
Which is why today’s DIY wooden photo holder is the perfect project to put your memories on display. It requires little time, but still packs in the eye-catching style your space needs.

Let’s jump right to it!
Here’s what you’ll need:
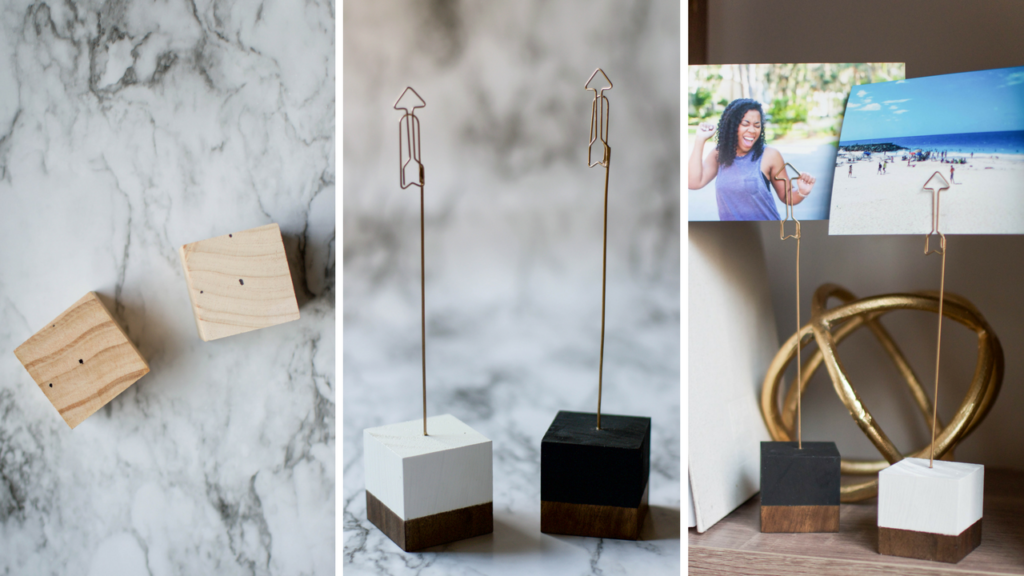
2” inch birch wood cubes (2 cubes)
Painter’s tape
Minwax wood finish in “Espresso” (8 oz. can)
Lint-free cloth (2 cloths)
Paint of your choice
1” foam paint brushes (2)
Drill
1/16 twist drill bit
E6000 craft glue
1/16 brass rods (two rods)
Arrow paper clips (or decorative paper clips of your choice)
Metallic gold spray paint (small can)
Pre-drill
First, measure and mark the center of your birch cube.

Next, drill a 1/16 hole into the center of the cube using your pre-marked measurement as a guide.

Stain Wood
Tape off ¾ inch of exposed wood on each cube.
 Then, using your lint free cloth, apply a small amount of wood stain to the exposed wood, rubbing with the grain. While applying the stain, be sure to rub away from the taped area. Applying in the direction of the taped area, against its edge, will cause stain to leak under the tape’s edge.

Next, allow to dry in a well-ventilated area for at least 15 minutes. Once dry, remove any excess stain from each cube with a damp cloth.
Paint Cube
Remove tape from each cube. Next, tape off just over 1 ¼ inch of exposed wood on each cube. A bit of stain should peak through each area taped off. The paint should overlap the stained area, allowing for a cleaner line of demarcation between the stain and paint.
Next, apply a small amount of paint to the exposed wood, while again brushing away from the taped area so as not to push paint beneath the taped edge. I used remaining black chalk paint and a white Benjamin Moore paint previously used in two earlier projects. Both paints are of two completely different consistencies, but with a careful hand gave similar results I was pleased with.


Allow paint to dry in a well-ventilated area for at least 1 hour.
For the purpose of your own project, I highly recommend using chalk paint in the colors of your choice for both cubes. Chalk paint is thicker, is less likely to show brush marks, and dries quicker to the touch. Take a look here for one of my larger projects completed using chalk paint, a stencil, and a little stamina.
Prepare Photo Clip
First, cut down both brass rods to your desired length. This can be done by applying a slight cut with scissors (scissors will not cut through the entire rod), and bending in both directions until rod is snapped. Next, line up the top edge of your rod with the lower-side edge of your paper clip, and apply a small amount of E6000 craft glue.
Hold both in place with your thumb and forefinger in one hand, while applying the glue with the other.
E6000 glue really packs a punch, but can take some time to dry, therefore if you let go of your rod and clip too soon, one will separate from the other. To speed up the initial dry time, blow-dry lightly on a cold setting for 1 minute. The adhesive should then be dry enough to release the rod without damage.

Allow adhesive to dry for at least 3 hours.
Once dry, lightly apply gold spray paint to both rods.

Allow paint to dry for at least 1 hr. Once dry, apply a small amount of E6000 glue to the end of your rod, and place in pre-drilled hole.


Place your favorite photos in each clip and enjoy!

If any of the supplies needed for this project can be switched out for items you already own, don’t miss your chance to save a buck or two! A darker stain, previous craft paints, and decorative paper clips are all common items previously purchased and often forgotten about. After shopping your own items, a quick trip to the craft store will set this project in motion.
I hope you enjoyed this tutorial and your DIY wooden photo holder is being put to good use, displaying some of your best memories. Use #TMABlog to show off the DIY photo holders you created.
For more DIY interior inspiration follow me at chicmisfits.com, and on IG @chicmisfits and on Pinterest @chic Misfits.
Latest posts by Jennifer Nesbitt (see all)
- Bring an Old Nightstand Back to Life with This D.I.Y. Nightstand Makeover - January 9, 2018
- Holiday Crafting: Creating Chic DIY Christmas Ornaments - December 19, 2017
- Do It Yourself: Chic Cubic Wooden Photo Holder - November 15, 2017


