
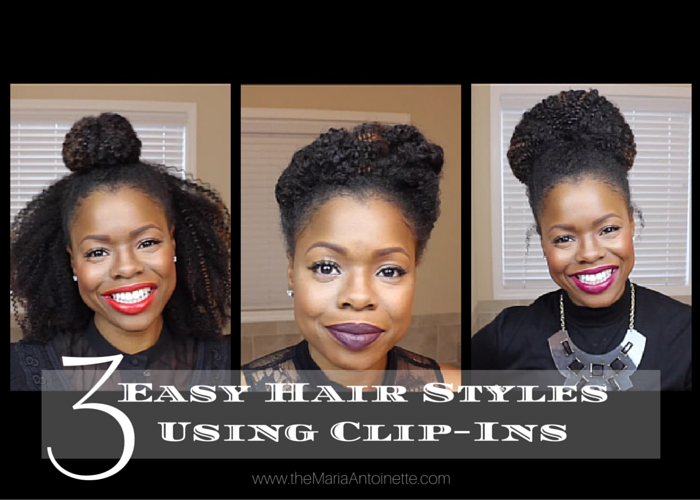
Last week I discussed how to install clip-ins extensions. Today I am sharing 3 easy hairstyles using clip-ins. Clip-ins offer many benefits like hair goals in a snap…literally a snap! The following 3 hairstyles are great because they are quick and easy to do and add diversity to your styling options. Each of these styles were created on an old twist out, so before you run to to cleanse your hair…give these looks a test drive.
What you will need:
- 2 bundles of Big Chop Hair Clip-Ins in 18 inches (Use Checkout Code MATV for free shipping in the US!)
- Clips
- Styling Cream, as needed ( I used Entwine Couture, you can use what you already have in your stash of natural hair products)
- Scarf/Bonnet (to secure style at night)
Twist & Pin:
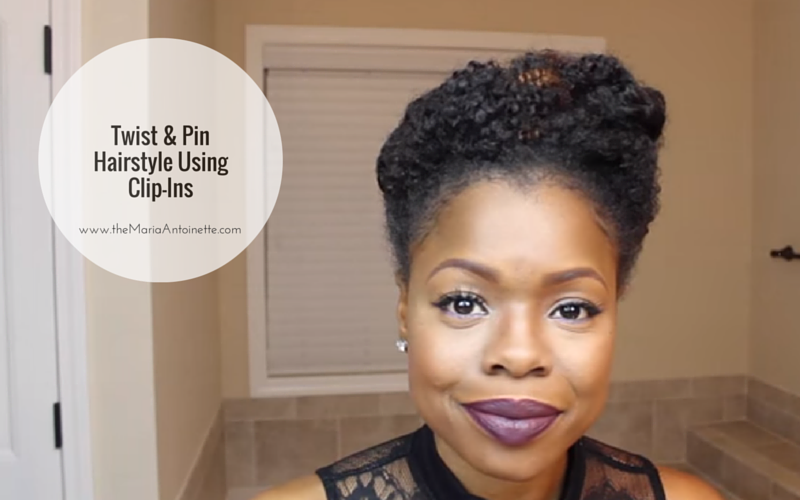
- Starting in the back of your hair, place clip-ins in an upward motion until you reach the middle of your head (about 3-4 rows of clip-ins).
- Place 2 row of clip-ins on top going back. Then make a part going from ear to ear.
- Section the top of your hair down the middle ( this does not have to be perfect), and make two loose twists, criss cross one twist behind the other.
- Tuck the ends of each tail into the other and secure with additional bobby pins.
- Repeat two times until all hair is twisted and pinned. You will have 6 twist when the looks is done.
- Notice that this look is not supposed to look perfect but full and fluffy.
Half Knot:

- Section hair in the back and add about 5-6 rows of clips-ins in a downward position.
- Once you get to the top, part off the hair for the top knot. The first clip-in will be added to the top middle going toward the face. Next 2 pieces will be clipped in going to the back.
- Take a small perimeter (leave out around your edges) to cover the last clip-in.
- Gather the top section with your ponytail holder and tie around 2-3 times depending on how loose/tight you want your ponytail. 2-strand twist the hair and then wrap around the base of the ponytail and secure with bobby pins. To ensure that the knot doesn’t just look like a ball sitting on top, pull some of the hair down toward the scalp using bobby pins to hold in place.
- Fluff the back and blend as needed and you’re all done!
Queen Top Knot:
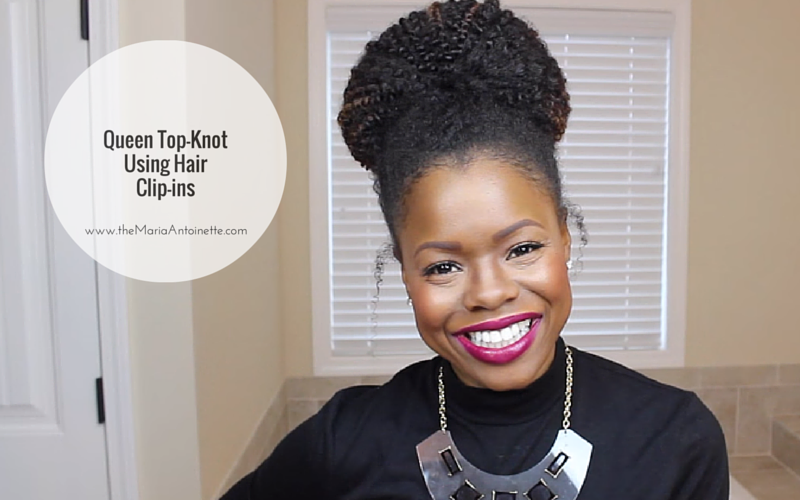
- Section the hair in ½ and start by adding clip-ins to the top half. Pull out perimeter hair and place clip-in going back in the middle. At the crown the next clip-in will be going forward (4 were used in top).
- Working from the middle and going down, place clip-in toward the face.
- Using an athletic-type headband, gather all of the hair on top and wrap around twice to make a ponytail.
- Fluff, straighten and flip hair back. You will end up with a peacock type/crown effect on top. With the hair going back, secure with bobby pins and your look is complete.
For more inspiration on how to complete these looks, be sure to check out the step-by-step video here:
What style/s can you see yourself wearing? Chime in below I would love to hear from you!
I would like to invite you to sign up for my newsletter, this way you will always be in the know with all things MA if newsletters aren’t your thing simply download my App!
~MA
Latest posts by Maria Antoinette (see all)
- 10 Romantic Date Night Ideas For Any Time of The Year - January 26, 2023
- Tips To Help You Reconnect With What Brings You Joy - January 19, 2023
- Planning A Road Trip? Here Are Some Key Tips You Should Know - January 12, 2023


That was very simple!
Thanks