
Clip-ins Extensions are not new but textured hair clip-ins are all the rave now. Clip-ins are a great way to add volume, length and that extra va va va voom to your own hair! Today I am sharing what works for me when I installed my textured clip-ins into my natural hair. This is the perfect way to get length and volume without the commitment of a full sew-in. So if you are in a squeeze or you want a new look this tutorial on How to Install Clip-Ins Extensions on Natural Hair is for you!
What you will need:
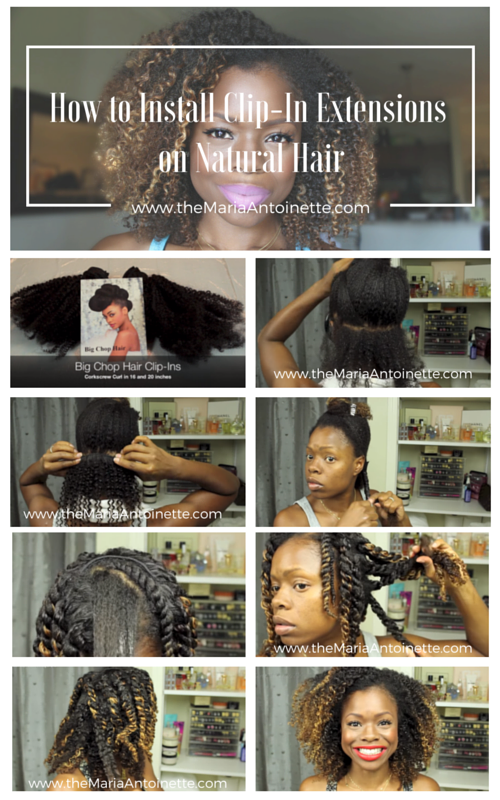
- 2 bundles of Big Chop Hair Clip-Ins in 16 and 20 inches ( I cut the 20″ to 18″ and applied the longer clip-ins on the top to create an even look). Use Checkout Code MATV for free shipping in the US!
- Clips
- Water Bottle
- Styling Cream ( I used Entwine Couture, you can use what you already have in your stash of natural hair products)
- Scarf/Bonnet
How to install the clip-ins:
- Start with clean damp hair and clean damp clip-ins
- Start from the nape of your head, it’s always best to work from the back to the front when adding clip-ins into your own hair.
- Part the hair in a horizontal part and place the clip-ins on that row.
- When you place the clip-ins attach the clips at the root of your natural hair, more on the hair so you won’t cause breakage.
- Always start in the middle of each section then leave the edges/sides for last.
- Part another section of hair, and repeat the process.
- For every 2 rows of clip-ins that you add, you will want to assure the hair and the clip-ins are damp, not wet.
- Apply your styling cream and do medium size 2-strand twist, make sure to twist all the way to the end. This helps your natural hair and the clip-ins have a similar curl pattern for a more natural look.
- Repeat until you get to the top of your head
- Make sure all of the twists are uniform in size
- For a flawless finish, flat twist your natural hair with plenty of product, on the top and edges so that the hair is silky and define.
- Place a scarf/bonnet on your hair and let it air dry overnight or sit under a hooded dryer.
- Remove the twists and style!
F.A.Q.
Q: How much hair did you use?
A: I used 2 bundles for an extreme look, if you just want a little volume, length and your hair is close to the same length of the clip-ins one bundle will work just fine.
Q: Can this work on shorter hair?
A: Yes it can, as long as you have about an 1.5 of hair it will work. Now to be honest it might not last as long due to the clips slipping. You will need 2 bundles to get a nice look.
Q: Can you sleep in these clip-ins? or did you redo this every night?
A: Yes I slept in my clip-ins every night for about 5 days. I simply pulled them all back into a low ponytail, anywhere I felt tugging I unsnapped/unclipped those clips. In the AM I simple re-clipped the clips I had unclipped the night before shook and was on my way.
Q:How long does this style last?
A: I wore my hair like this for 5 days…can possibly last longer but I was running and being very active when I was wearing them.
Q: Will they fall out?
A: No, because you are twisting them into your real hair…the clip-ins become inter woven with your real hair so even if the clips are undone the clips will not slip out!
Check out this step by step video tutorial…don’t laugh at me I was totally feeling myself!!!
So can you see yourself rocking clip-ins? What styles would you wear? Chime in below I would love to hear from you!
I would like to invite you to sign up for my newsletter, this way you will always be in the know with all things MA if newsletters aren’t your thing simply download my App!
~MA
Latest posts by Maria Antoinette (see all)
- 10 Romantic Date Night Ideas For Any Time of The Year - January 26, 2023
- Tips To Help You Reconnect With What Brings You Joy - January 19, 2023
- Planning A Road Trip? Here Are Some Key Tips You Should Know - January 12, 2023


